Showing posts with label Breads. Show all posts
Panettone

Panettone


Recipe

350 grams bread flour

70 grams brown sugar

4 grams salt

25 grams panettone seed powder

4 grams instant yeast

175 grams milk

1 egg yolk

1 egg

100 grams butter

80 grams raisins

20 grams lemon peel

40 grams orange peel

2 teaspoons brandy

1.        Rinse the raisins in lukewarm water, drain thoroughly, and combine with the  orange peel, lemon peel, and brandy. Let rest for 30 minutes or overnight if you have time. Bring the butter to room temperature.

2.        In a small bowl, mix the milk, egg yolk & egg.

3.        In a large bowl, add the strong flour, brown sugar, salt, panettone powder and yeast and mix well with a whisk. Add the milk/egg mixture and mix with a board scraper.

4.        Once it comes together, put on a clean surface and knead until the dough is smooth, about 5 – 10 minutes. Cover with the bowl and let rest for about 10 minutes. Next, knead in the ​​butter in portions and knead thoroughly for about 10 – 15 minutes.

5.        Spread out the dough and knead in the fruit in several batches.

6.        Once the dough is mixed evenly, roll it into a nice ball and place it in a bowl, cover with plastic wrap and leave to rise in a warm place at around 30°C for about 60 to 90 minutes.

7.        When the dough has doubled in size, the first rise is complete.

8.        Put the dough out onto a floured surface and lightly knead to release the air.

9.        Shape the dough. Gather the dough in the center and form it into a ball.

10.     Flip it over and pull the dough with your hands to make it into a taut ball.

11.     Place in a panettone cup with the seam facing down. Leave to rise in a warm place (about 30℃) for about 60 to 90 minutes.

12.     Before baking, cut a small cross on the top and place several pieces of butter into the slices. Lightly brush the top with egg wash.

13.     Place in an oven preheated to 190℃ for 10 minutes. Then reset to 180℃ and bake for 40 to 45 minutes. 


Read more »
Kathy
0 Comments
Swedish Rye Bread

Swedish Rye Bread


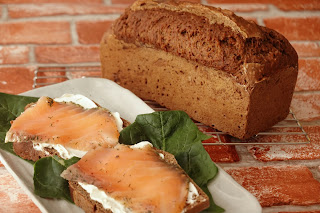
The official name of this bread is Kavring. It has a nice brown color and a slightly sweet taste. The bread is quick to put together since it does not contain yeast but is leavened using baking powder and baking soda.

I used a standard size loaf pan for baking the bread. This recipe is quite generous and makes two loaves. 

Recipe
180 grams bread flour
90 grams rye flour
1 teaspoon baking soda
3/4 teaspoon baking powder
3/4 teaspoon salt
1/3 cup Golden syrup and molasses (add some of both to fill 1/3 cup)
270 grams milk

1. Whisk together the flours, baking soda, baking powder and salt together in a bowl. Mix together the milk and the syrup/molasses in another bowl then add to the flour mixture in portions. Mix thoroughly with a spatula. 
2. Preheat the oven to 95 degrees Celsius.
3. Bake for 1 hour at 95 C. then raise the temperature to 150 C. and bake for another 30 - 40 minutes. The bread should have a nice rise when it is fully baked.
4. Let the bread cool for a few minutes before removing from the pan. Cool completely before slicing. 

This bread tastes great with cream cheese and smoked salmon. 

Thank you to https://true-north-kitchen.com/wprm_print/8541# for this recipe. 


Read more »
Kathy
0 Comments
Rosemary Potato Bread

Rosemary Potato Bread


This is a robust but soft bread. The addition of the mashed potatoes adds more moisture to the loaf. This bread is delicious toasted with jam for breakfast or served with Sunday dinner.

Recipe:

375 grams bread flour

3/4 teaspoon salt

2 teaspoon pepper

5 grams sugar

1 1/2 teaspoon instant dry yeast

100 grams mashed potatoes (cooked mashed potatoes)

30 grams butter (room temperature)

2 tablespoons chopped fresh rosemary

200 grams water

1 egg mixed for egg wash

  1. Using a stand mixer, mix the flour, salt, pepper, yeast, sugar, rosemary & water in the stand mixer until the mixture is well incorporated. Add the mashed potatoes and continue to mix. Lastly, add the butter and mix until it is becomes smooth.
  2. Put on a flat surface and finish kneading until the dough is soft and supple. 
  3. Oil the bottom & sides of a bowl and put the dough inside. Cover with wrap. Let sit in a warm place for about 1 hour or until bread doubles in size.
  4. Remove dough from bowl. Cut dough into 2 equal pieces and roll into 2 balls. Place each piece side-by-side in a buttered bread pan. Cover with plastic wrap and let sit for about 1 hour in a warm place. Decorate with several pieces of rosemary and lightly brush with egg wash before baking.
  5. Preheat the oven and bake at 200 C. for about 45- 50 minutes. After baking, let cool for about 10 minutes before removing from the pan. Cool completely before slicing.
Read more »
Kathy
0 Comments
Sourdough Banana Bread

Sourdough Banana Bread


During my stay at home days, I have been learning how to make sourdough starter and sourdough bread. Once the sourdough starter is ready though, it should be used and fed everyday. This is fine if you are plan to bake bread everyday, but I don't need that much bread in the house on a regular basis, so I looked for other ways to use the bread starter.

Lots of banana goodness in this loaf
Of course, a short search on the Internet produced many recipes that use sourdough starter in other baked goods than just bread. My favorite site for all things sourdough is The Perfect Loaf, this site is really a labor of love and painstakingly provides thorough and clear instructions for starting on the sourdough road. The  below recipe is from the Perfect Loaf but I have decreased the original recipe in half since I needed a smaller size bread. I also added a few walnuts and a banana on top.

Recipe
120 grams all purpose flour
1/4 teaspoon baking soda
1/4 teaspoon salt
50 grams chopped walnuts
65 grams butter (room temperature)
50 grams brown sugar
1 egg
65 grams sourdough starter
1 tablespoon honey
2 medium size bananas (mash with a fork)
1 tablespoon olive oil
1 teaspoon vanilla
1 banana for topping before baking

1. You can use a stand mixer or make by hand. This recipe description does not use a stand mixer. Prepare a loaf pan by lightly buttering and dusting with flour.
2. In a small bowl, measure together the flour, baking soda and salt.
3. In a large bowl, whisk the butter then add the brown sugar and mix. Next add the egg and mix together. Add the ingredients sequentially, but complete mixing before adding the next. Continuing mixing in the sourdough starter, honey, mashed bananas, olive oil, vanilla, flour and nuts.
4. Pour the mixture into the loaf pan. Slice a banana lengthwise and place on top before baking.
5. Bake in a preheated 180 degrees Celsius oven, for 35 - 40 minutes. Let cool for about 20 minutes before removing from the baking tin.

Sliced and ready for breakfast
Read more »
Kathy
4 Comments
Covid Collaboration Polish Chałka

Covid Collaboration Polish Chałka


Hope everyone has friends or acquaintances to help provide baking inspiration during quarantine. Luckily, Facebook can enable and help us create new contacts. Nothing like a group bake to add a little excitement to the quarantine routine.


Among my FB friends, the baking challenge chosen was a Polish Chalka. This is a braided egg bread with raisins, if you choose, and is similar to a Jewish challah. The recipe was an inspiration from the Spruce Eats so please check the site for her full recipe, tips and tricks. I missed to bake bread at Easter and this satisfied my craving.

The original recipe produced a large loaf of bread, and with only two people in my home, I decided to reduce the portions. Also, if you don't have a stand mixer handling a large amount of dough by hand is challenging.

The below version is for a smaller bread but should be plenty for 4 - 5 people. I made a few tweaks, especially reducing the sugar.

Recipe
85 grams butter (room temperature)
100 grams sugar
1/4 teaspoon salt
170 grams milk
6 grams instant dry yeast
1 egg (room temperature)
415 grams all purpose flour
80 grams raisins (optional)

1. In a large bowl, sift together the flour and yeast.
2. In a saucepan, heat the milk to just boiling then pour into a bowl and cool lightly. Add the butter, sugar, egg and salt and mix thoroughly.
3. Add the milk mixture in 4 - 5 portions to the flour so that it is easier to mix especially if you are it doing by hand. Use a spatula or bench scraper to mix the dough. If you have a stand mixer then you can use it with a dough hook to mix everything.
4. Once thoroughly mixed, put on a flat board and knead the dough until smooth. The dough should be soft and supple. If it feels tough, spray lightly with water and knead until it begins to feel soft. Roll into a ball and let sit under a bowl for about 10 minutes.
5. After the dough rests under the bowl, add the raisins and mix in thoroughly. Roll into a ball and put in a lightly greased bowl and cover with plastic wrap and let rise for 1 hour in a warm space.
6. After the rise, divide into 3 equal pieces and shape into 3 logs about 35 cm long.  Braid the logs together and place on a baking sheet. Lightly brush with egg wash.
7. Let rise in a warm place for about 40 minutes. Bake at 190 degrees Celsius for about 30 minutes. If the bread starts to brown too quickly then cover with foil until baking is finished.
8. Cool thoroughly before cutting.

My braid was quite tight so was careful to bake thoroughly

Bread with jam is a great breakfast
Read more »
Kathy
1 Comments
Lockdown Banana Bread

Lockdown Banana Bread


I live outside Tokyo and technically we are not in a lock down, yet, but I have been in a work-from-home situation since mid-March. Japan has been aware of the virus since February due to close proximity to China so this is an ongoing story. During this stay at home time,  I've tried to show some constraint and only baked what could be reasonably consumed over a couple of days.

Instead of making fancy and fussy cakes, I just feel like a simple, quick and easy snack. With an easy recipe, I've been able to prepare dinner and make dessert at the same time. First was chocolate chip cookies, then oatmeal cookies and lastly this delicious banana bread.

Get the coffee ready
This simple recipe was borrowed from Sallysbakingaddiction and I added a few chocolate chips and an extra banana on top for decoration. I reduced the brown sugar a bit since the ripe bananas provide enough sweetness and the vanilla really draws out the banana flavor.

Recipe
(Fits 2 baking pans)

250 grams all purpose flour
1 teaspoon baking soda
1/4 teaspoon salt
1/4 teaspoon cinnamon powder
115 grams butter (room temperature)
120 grams brown sugar
2 eggs (room temperature)
80 grams plain yogurt
3 ripe bananas
1 teaspoon vanilla extract
40 grams chopped walnuts
25 grams chocolate chips

1. In a bowl, sift together the flour, baking soda, salt & cinnamon powder.
2. In a small bowl, use a fork to mash 2 bananas.
3. In another larger bowl, use a small whisk to mix the softened butter until smooth. Next add the brown sugar and mix thoroughly. Add each egg separately and mix gently until each egg is incorporated thoroughly. Lastly, add the yogurt, mashed bananas and vanilla extract.
4. Add the flour mixture in portions to the butter mixture. Use can use a spatula or small whisk to mix. Lastly, add the nuts and chocolate chips.
5. Lightly butter and flour the baking tins and then divide the batter evenly between the two tins. Peel and slice one banana lengthwise and put a slice on top of each tin in the middle of the batter.
6. Preheat the oven and bake at 180 degrees Celsius for 35 - 40 minutes depending on your oven.
 7. After baking, cool for about 10 minutes before removing from the pan to cool completely.
Read more »
Kathy
0 Comments
Easy and quick Dutch Baby

Easy and quick Dutch Baby


It is only December 29th but time to move past the Christmas baking. Lots of cookies and cakes were baked over the holiday season. I don't have any special recipe for New Year's desserts but chocolate is always good when the weather is cold. Chocolate is a lot easier to handle when the weather is cool.

My recipe for today is a Dutch Baby. I am probably one of the last ones to know about this dish but happy I finally found it. A TV show in Japan was demonstrating recipes from the TV show Chicago Fire and the Dutch Baby was the recipe demonstrated. I grew up using cast iron skillets and I have bad memories about washing them so that is why I don't have one in my house now. Anyway, after seeing the explanation about the Dutch Baby I decided it was time to reacquaint myself with iron skillets.

Basically, the Dutch Baby has a popover like bottom and then topped with your favorite fruit or other filling.

Basic Recipe for a small 15 cm iron skillet
(15 minutes prep time and 15 minutes for baking)
Serves 2 - 3

30 grams all purpose flour
1 teaspoon sugar
1 egg
50 grams milk

Approximately 1 teaspoon butter for coating the pan

1. In a bowl, sift together the flour and sugar then add the egg and mix with a small whisk.
2. Lastly, add in the milk in about 3 portions and mix with the whisk. Just stir enough to combine everything.
3. Preheat the over to 200 degrees Celsius then place the iron skillet in the oven for 10 minutes to warm up. When heated, add the butter and swirl it around the pan to coat it entirely.
4. Pour the batter into the pan and put back into the oven and back for about 15 - 18 minutes.
5. Remove from the oven and fill with your favorite filling. There is a lot of air in the Dutch Baby when it is baked so after removing it will deflate like a souffle.

For my Dutch Baby filling, I lightly sauteed an apple that was peeled & sliced  in a fry pan with about 3 tablespoons sugar and a few dashes cinnamon.

My recommendation is to serve it warm just out of the oven. Always be careful to handle the skillet since it very hot.
Read more »
Kathy
1 Comments
Summer Berry Pancakes

Summer Berry Pancakes


It isn't just a recent thing but pancakes have landed on most of the dessert menus in Japan. The slogan "pancakes are not just for breakfast" is taken very seriously here. For me, I prefer pancakes at breakfast with a cup of coffee rather than after a big dinner. The International House of Pancakes (IHOP), an American pancake restaurant icon, is no longer in Japan but that hasn't slowed the growth of pancake lovers.

Hawaiian pancakes have also become popular in Japan. However, besides the tropical flavored syrup such as mango, passion fruit and coconut there isn't that much uniquely Hawaiian about them. I may be wrong and if anyone knows something different, please correct me.

I have to admit that with the abundance of excellent pancake mixes, I am a bit reluctant to whip up a batch from scratch. Due to all of the desserts I usually have around the house, I try to keep the calories down by skimping on breakfast, thus, pancakes are almost never on my breakfast table.

Since I am from the U.S. my go-to-favorite for pancakes mixes is Bisquick. Just a add milk and eggs to the mix and you are ready to start grilling the pancakes in just minutes. The evil calorie laden sister of pancakes is waffles and Bisquick can be used just as easily on the waffle press. I won't allow a waffle press into my house for fear of too many Sunday waffle breakfasts.

For those of you who do want to make pancakes from scratch, the recipe is quite basic. All you need is milk, eggs, flour, baking powder and a little salt. Another of my cooking resources is Martha Stewart and she provides a simple and quick pancake recipe.

Good luck on your pancake or waffle baking and drop me a note if you have an interesting twist on this traditional breakfast or dessert.


Read more »
Kathy
1 Comments
Hearty Cheddar Cheese and Bacon Bread

Hearty Cheddar Cheese and Bacon Bread


This bread is very hearty and can make a full meal by just adding a soup and salad. The cheddar cheese and bacon are a delicious combination for an evening meal or lunch.

Recipe

525 grams bread flour
1 1/2 teaspoon salt
1/2 teaspoon yeast
370 grams water
150 grams grated red cheddar cheese
100 grams bacon (diced and fried, remove extra grease by draining on a paper towel)
15 grams butter (room temperature)

1. Combine flour, salt and yeast in a bowl and use a small whisk to mix together well.

2. Pour the water over the flour mixture in portions and use a spatula or bench scraper to mix together. After everything is mixed, place on a flat surface and knead together for about 5 - 10 minutes until the dough is soft.  Dough should be soft but not sticky. Let rest under a bowl for about 10 minutes.

3. Lightly warm the butter in your hands and then put on top of the dough and use a bench scraper to incorporate the butter. Knead again so that the bread is soft & supple. If tough, add a tablespoon or so of water and knead again. Add in the cheddar cheese and bacon. Roll into a well formed ball and put in a bowl and cover with wrap. Let rise in warm place for 60 minutes.

4.  Divide the dough into 2 pieces, each with the same weight. Roll each piece into a nice ball. Place on the kneading board and cover with plastic and let rise for 20 minutes (bench time).

5. Flatten each ball to remove the air and roll again into a ball. Place in the bread tin and brush with egg. Place in a warm place. Should rise again for about 60 minutes.

6. Heat oven to 200 degrees Celsius. Brush again with egg and bake for about 50 minutes. Cover with foil half way through if the top is getting too browned.


Read more »
Kathy
0 Comments
Spicy Jalapeno and Cheddar Cornbread

Spicy Jalapeno and Cheddar Cornbread


Last muffin left with a few crumbs !
Cornbread is a tasty & hearty accompaniment to lighter meals such as fish tacos and salads.

There are many ways to jazz up traditional cornbread and adding jalapenos and cheddar cheese is among my favorites. These two ingredients are quick to put together and really add a zip to a traditional food.

This recipe only takes about 20 minutes to put together.

Makes about 8 - 10 muffins

Let's get baking!


Flour 150 grams
Cornmeal 100 grams
Baking powder 8 grams
Baking soda 1 gram
Salt 3 grams
Brown sugar 40 grams
Canned corn 85 grams
Buttermilk 155 grams
Eggs 2
Butter 60 grams
50 grams jalapeno peppers (chopped)
50 grams cheddar cheese (chopped)


  1.  Sift the flour, cornmeal, baking powder, baking soda & salt together.
  2. Melt the butter over hot water or in the microwave.
  3.  In a blender mix the corn. In a bowl, mix the brown sugar and milk and mix with a small whisk. Add eggs & corn and continue to mix until well blended.
  4.  Mix the corn mixture above into the flour mixture and mix with a spatula. Add the melted butter. Mix until everything is just moistened – don’t over mix. Lastly, add the jalapeno peppers and cheddar cheese.
  5.  Prepare muffin cases by lightly buttering & dusting with flour. Fill about 85% full.
  6. Bake at 170  degrees Celsius for about 25 – 30 minutes.
Ready for dinner

Cornbread & taco toppings
Read more »
Kathy
0 Comments
Buttery Chocolate Brioche

Buttery Chocolate Brioche


Chocolate Brioche


The trick to incorporate the chocolate into many layers of the dough is to fold the chocolate into the dough as if you are making puff pastry.  The chocolate should be well chilled before spreading it on the dough though otherwise it becomes difficult to work with.


Recipe
300 grams bread flour
15 grams sugar
50 grams honey
6 grams salt
5 grams instant dry yeast
150 grams milk (room temperature)
1 egg (room temperature)
50 grams butter (room temperature)


1.   In a bowl mix together the flour, sugar, salt and yeast with a small whisk. In a separate bowl, mix the egg, milk and honey.
2.   Add the milk mixture to the flour and use a bench scraper to mix and coat the flour thoroughly.  Put on a flat surface and knead for about 10  minutes. Dough should be soft but not sticky. Let rest under a bowl for about 10 minutes.

3.   Put the butter on top of the dough and use a bench scraper to incorporate the butter by slicing it into the dough. Knead again so that the bread is soft & supple. If tough, add a tablespoon or so of milk and knead again.  Put in a clean bowl and cover with plastic wrap. Let rise in warm place for 50 minutes.

 4. Flatten the dough & divide it into 2 equal weight pieces. Roll each piece into a nice smooth ball. Place on the kneading board and cover with plastic and let rise for 20 minutes (bench time).

Chocolate Filling
50 gr of dark chocolate
50 gr of sugar
30 gr of flour
20 gr of cocoa powder
1 egg white
75 grams of milk
Pinch of salt
25 gr butter

1. Finely chop the chocolate with a grater or with food processor.

2. Mix the sugar, flour, cocoa and egg whites in a bowl.


3. Heat the milk until just boiling. Slowly pour the milk into the cocoa mixture while stirring. Mix until well blended. Put everything back into the saucepan over low heat, stir until thickened.


4. Add the salt, butter and chopped chocolate and stir until everything has melted.


5. Pour the mixture into a bowl and let it cool completely. Spread the filling into two rectangles of oven paper about 25x20cm, cover each of the sheets with film and put it in the freezer until they are solid.

Putting together
1.  Take one of the dough halves and roll out into the shape of a rectangle of about 30 x 21 cm. Put the frozen dough in the center and remove the plastic wrap. Let the chocolate warm up a few minutes then use a palette knife to ensure it is spread evenly over the dough.


2. Fold the dough in thirds. Fold down the top half and then the fold the bottom half so that it is overlapping the top half. Flatten with a rolling pin and fold again using the same method. Finally, fold up the dough from the long end (like making cinnamon rolls) and then cut the 'log' into about 7 pieces.

3. Place each piece into a baking cup and brush with egg. Place in a warm place to rise until about doubled in size.


4. Repeat the same process for the other half of dough.

5. Bake at 200 degrees Celsius for about 20 minutes.

Read more »
Kathy
0 Comments
Donuts to Die For

Donuts to Die For


Ready for Breakfast
This was my first time to make donuts from scratch and I found that they were shockingly delicious! Warm fresh donuts have to be about the best treat for an early morning breakfast - or for anytime!

Actually, making donuts doesn't take that much more time than baking bread. In fact, all processes are the same except that you need to fry the dough instead of bake it.


Recipe
(makes about 12 donuts)

40 grams sugar
170 ml water
8 grams instant dry yeast
3 eggs (room temperature)
500 grams flour
8 grams salt
100 grams butter (room temperature)

Water temperature should not be above 35°C / 95°F, or it will destroy the yeast. 1.     In a bowl, mix  the flour, sugar and yeast & salt. In another bowl, mix the eggs & milk then add to the flour mixture and mix well with spatula.
2.  Put the dough on a flat surface and knead well until the dough is soft. Place the dough under a bowl and rest for 10 minutes. Then slowly incorporate the butter cubes and knead well with your hands until the dough is glossy and smooth. Shape into a smooth ball and place in a clean bowl.
3.   Cover the bowl with plastic wrap and leave to proof at a warm temperature for about 1 hour or until doubled in size. Punch down the dough, then re-cover the bowl. Put in the fridge to chill for 12 - 16 hours or overnight.
The doughnuts will be more delicious and easily digested if you leave them to chill overnight. If you don't have the time, leave that part out. 4.    The next day, take the dough out of the fridge and cut it into 45 gram pieces. Shape them into smooth, tight buns and place them on a baking tray lined with parchment paper. Leave plenty of room between them to proof. Leave for 1 hour, or until about doubled in size.
5. Get a heavy-based saucepan. Fill it up to the halfway point with oil. Heat the oil to 155°C. Carefully remove a couple of doughnuts from the baking tray, take care not to deflate them, and put them into the oil. Fry for 3 minutes on each side until golden brown. Remove from the oil and place on a tray lined with paper towels. Set aside to cool before filling. Lightly dust with powdered sugar when they start to cool.


Custard filling
500 grams milk
4 egg yolks
50 grams sugar
40 grams flour
6 grams gelatin (softened)

1.       Put milk in a saucepan and bring slowly to a light boil.
2.       Meanwhile put egg yolks, sugar and flour in a bowl and mix for a few seconds. Pour the milk over the yolk mixture, whisking constantly then return the mixture to the saucepan.
3.    Cook over medium low heat, whisking constantly for about 5 minutes, until thickened then add the softened gelatin. Pour into a bowl to cool.
4.    Place a sheet of plastic wrap on the surface of the custard to prevent a skin forming. Leave to cool.
5.  To fill the donuts, fill a piping bag with the custard cream and pipe it into the doughnuts. First, make a small hole in the donuts using a tooth pick to make filling the donuts easier then pipe in the custard. Sprinkle the doughnuts with powdered sugar and eat them right away or store in an airtight tin. Enjoy
Custard cream is bursting out of the donuts

Breakfast buffet is ready
Read more »
Kathy
0 Comments
Fluffy Milk Rolls

Fluffy Milk Rolls


Serve with beef, chicken or fish!
These rolls are soft and delicious and tasty for either dinner or breakfast with jam.

This bread has one unique step which is to make the starter. This starter is made on the stove top and only takes a few extra minutes.


Starter
  43 grams water
 43 grams whole milk
       14 grams bread flour

         1. For the starter, combine all of the ingredients in a small saucepan, and whisk until no lumps remain. Place the saucepan over low heat, and cook the mixture, whisking constantly, until thick and the whisk leaves lines on the bottom of the pan, about 3 to 5 minutes.
        2. Transfer the starter to a small mixing bowl and let it cool to room temperature.
     Dough
         298 grams bread flour
        7 grams nonfat dry milk
        30 grams sugar
        1 teaspoon salt
        1 tablespoon instant dry yeast
        113 grams milk (room temperature)
        1 large egg
        57 grams butter (softened
        1. To make the dough, combine the starter with the remaining dough ingredients (don't add the butter yet), then mix and by hand until a smooth dough forms. Place on a flat board and knead until soft and let sit for 10 minutes covered with plastic. Lastly, add knead in the butter.
         2. Shape the dough into a ball, and let it rest in a lightly greased covered bowl for 60 minutes.
         3. Gently deflate the dough, divide it into 40 gram pieces, and shape each piece into a ball.
 
         4. Place the rolls into a lightly greased round bun pan and brush lightly with an egg wash. Cover the pan, and let the rolls rest for 40 to 50 minutes.
          5. Preheat the oven to 190 degrees C. Bake for 20 - 30 minutes, until golden brown on top.

Leave a small space between rolls to bake
          6. Remove the rolls from the oven. Allow them to cool in the pan for 10 minutes, then transfer them to a rack to cool completely.
I bake the rolls on a flat silpat sheet
                   Yield: about 15 rolls.
Read more »
Kathy
0 Comments
Hot Pocket Sandwiches

Hot Pocket Sandwiches


Hot Pocket Sandwiches

Sandwiches stuffed with vegetables, spicy ham and melted cheese


These sandwiches can be made with any simple bread recipe. Below is the recipe I used.

Prepare the ingredients you want to put inside the sandwiches such as fried eggplant, mushrooms, ham, red pepper, cheese, etc.and let cool if you have cooked them.

Bread recipe:
Bread flour 200 grams
Salt 3 grams
Instant dry yeast 3 grams
Water 130 grams
Butter 15 grams

1. In a bowl, sift together the flour and salt together. Add the yeast then mix in the water.

2. Use a bench scraper to mix and coat the flour. Put on a flat surface and knead for about 10  minutes. Dough should be soft but not sticky. Let rest under a bowl for about 10 minutes.

3. Lightly warm the butter in hands and then put on top of the dough and use a bench scraper to incorporate the butter. Knead again so that the bread is soft & supple. If tough, add a teaspoon of water or so and knead again. Put in a bowl and cover with wrap. Let rise in warm place for 60 minutes.

4. Divide the dough into 80 gram pieces. Roll each piece into a nice ball. Place on the kneading board and cover with plastic and let rise for 20 minutes (bench time).

5. Flatten each ball to remove the air then roll out flat and put some of the vegetable ingredients on one side of the bread and top with cheese and then fold over the other side of the bread and seal. Brush with egg.

6. Cover with plastic and place in a warm place. Should rise again for about 45 minutes.

7. Heat oven to 210 degrees Celsius. Bake for about 20 - 25 minutes until browned.

A little wine and salad to accompany
the sandwich
Read more »
Kathy
0 Comments
Popping Popovers

Popping Popovers


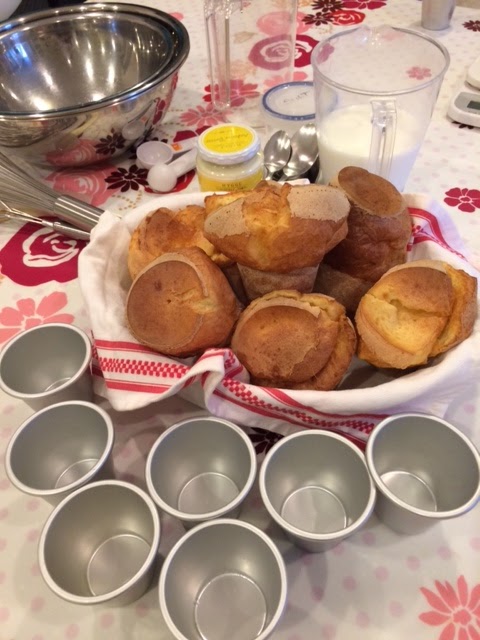
This finished product with prep materials
Too long since the last post. Apologies. Life and work has been too busy:)

I have discovered Popovers! I tried making these a couple of years ago and must have had a bad recipe and they did not turn out well at all. This last week had to make popovers for a demonstration on a TV program and this time around they were much improved.

There are just a couple important points which ensure a successful batch of popovers everytime which I will share.

The recipe only has 4 ingredients so can't get much simpler than that.


Recipe:
(from Martha Stewart)

Have all of the ingredients at room temperature before combining! You can put the milk in the microwave for a few seconds to warm it up if necessary.

Prepare the baking cups. Metal is preferred to paper. Ligthly butter and flour the inside of each cup.

3 eggs
220 grams (1 1/2 cups) milk
180 grams (1 1/2 cups) flour
1 1/4 teaspoon salt

1. In a bowl, sift together the flour and salt.
2. In another bowl, mix together the eggs and milk. Mix together with a whisk for 2 - 3 minutes until everthing is well combined.
3. Mix the flour/salt mixture into the milk mixture in portions using a whisk. Stir for 2 - 3 minutes until everthing is well combined. Do not over mix.
4. Heat the oven to 210 degrees Celsius and place the cups into the oven for about 6 minutes so that they are hot! The butter will become a little browned.
5. After heating the cups, pour the mixture into the cups about 1/3 full and return to the oven. Bake at 210 degrees Celsius for 20 minutes then reduce to 170 degrees Celsius for another 20 minutes to bake further. Do not open the oven while baking since the air will be released.
6. When finished baking, immediately remove from the baking cups and poke with a toothpick to release the air.

These are best eaten while they are warm. Enjoy!!

Marmalade goes very well with the Popovers

Baking together with new friend from NHK

Read more »
Kathy
0 Comments
Savory Olive Oil and Thyme Dinner Rolls

Savory Olive Oil and Thyme Dinner Rolls


Ready for dinner!
I really enjoy baking bread, just wish I had more time to make it.  Making bread at home is a luxury.

This is a basic recipe and you can easily add other ingredients to add extra zest such as black olives or nuts.

This bread is soft and easy to eat, great as a sandwich roll as well.

Here is the recipe:

375 grams flour
35 grams sugar
7 grams salt
6 grams yeast
100 grams milk
100 grams water
1 egg
40 grams olive oil
Fresh thyme (4 - 5 pieces)

1. In a bowl, sift together the flour, sugar and salt. Add the yeast. Mix the egg, water and milk in another bowl.

 2. Add the egg mixture to the flour.  Use a bench scraper to mix and coat the flour. Put on a flat surface and knead for about 10  minutes. Dough should be soft but not sticky. Let rest under a bowl for about 10 minutes.

 3. Stretch the dough and pour 1/3 of the olive oil over it, knead well to incorporate the oil. Repeat several times until all of the oil has been added. Knead until the bread is soft & supple. If  the dough feels too dense, add a teaspoon of water or so and knead again. Add in the thyme. Put in a bowl and cover with wrap. Let rise in warm place for 60 minutes.

 4. Divide the dough into 70 gram pieces. Roll each piece into a smooth ball. Place on the kneading board and cover with plastic and let rise for 20 minutes (bench time).

 5. Flatten each ball to remove the air and roll again into ball. Place on the pan you will use for baking - leave room between each piece since they increase in size during rising. Brush with olive oil. Cover with plastic and place in a warm place. Should rise again for about 30 minutes.

 6. Heat oven to 210 degrees Celsius and bake for about 20 - 25 minutes until browned.
Read more »
Kathy
0 Comments