Panettone

Panettone


Recipe

350 grams bread flour

70 grams brown sugar

4 grams salt

25 grams panettone seed powder

4 grams instant yeast

175 grams milk

1 egg yolk

1 egg

100 grams butter

80 grams raisins

20 grams lemon peel

40 grams orange peel

2 teaspoons brandy

1.        Rinse the raisins in lukewarm water, drain thoroughly, and combine with the  orange peel, lemon peel, and brandy. Let rest for 30 minutes or overnight if you have time. Bring the butter to room temperature.

2.        In a small bowl, mix the milk, egg yolk & egg.

3.        In a large bowl, add the strong flour, brown sugar, salt, panettone powder and yeast and mix well with a whisk. Add the milk/egg mixture and mix with a board scraper.

4.        Once it comes together, put on a clean surface and knead until the dough is smooth, about 5 – 10 minutes. Cover with the bowl and let rest for about 10 minutes. Next, knead in the ​​butter in portions and knead thoroughly for about 10 – 15 minutes.

5.        Spread out the dough and knead in the fruit in several batches.

6.        Once the dough is mixed evenly, roll it into a nice ball and place it in a bowl, cover with plastic wrap and leave to rise in a warm place at around 30°C for about 60 to 90 minutes.

7.        When the dough has doubled in size, the first rise is complete.

8.        Put the dough out onto a floured surface and lightly knead to release the air.

9.        Shape the dough. Gather the dough in the center and form it into a ball.

10.     Flip it over and pull the dough with your hands to make it into a taut ball.

11.     Place in a panettone cup with the seam facing down. Leave to rise in a warm place (about 30) for about 60 to 90 minutes.

12.     Before baking, cut a small cross on the top and place several pieces of butter into the slices. Lightly brush the top with egg wash.

13.     Place in an oven preheated to 190 for 10 minutes. Then reset to 180 and bake for 40 to 45 minutes. 


Read more »
Kathy
0 Comments
Sakura and Matcha Parfait

Sakura and Matcha Parfait


March is the time for cherry blossoms in Japan, however, the month can be finicky - warm some days and down right cold on others. Cherry blossoms bloom in Japan in a wave starting from the southern area of the country and slowly move north. Just to add confusion to this story, there are different types of cherry blossoms. Some types of blossoms are early bloomers and show their pink flowers even in early February.

March isn't just about blossoms; it's a month of transitions and closures in Japan. It marks the traditional end of the fiscal year for companies and schools alike. Companies wrap up their year-end books at the end of March and start fresh from April. Students also start their school year from April.

March signifies the conclusion of one chapter and the anticipation of the next. Against the backdrop of fleeting cherry blossoms, a sense of renewal lingers in the air.

This matcha parfait is all dressed up to celebrate the sakura season and is easy to put together. Choose your favorite dish and start the layering. Assemble your own masterpiece with layers of delight: I made mine with a luscious strawberry mousse at the bottom, followed by a dollop of Greek yogurt sweetened with condensed milk, sprinkled with crunchy granola, and crowned with a velvety matcha mousse. Let your creativity bloom as you craft your springtime parfait, capturing the essence of the season in every spoonful.


Read more »
Kathy
0 Comments
Spring Japanese Wagashi

Spring Japanese Wagashi


Spring is the time for cherry blossoms in Japan. As the warm spring breezes blow in, the seasonal blossoms are soon to follow.

Wagashi, Japanese sweets, are the perfect platform for expressing the seasons in beautifully designed desserts. Designs made of nerikiri are the perfect expression of the spring season.

Read more about wagashi on Medium.


Hope to see you there!


Read more »
Kathy
0 Comments
Swedish Rye Bread

Swedish Rye Bread


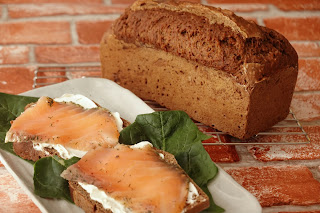
The official name of this bread is Kavring. It has a nice brown color and a slightly sweet taste. The bread is quick to put together since it does not contain yeast but is leavened using baking powder and baking soda.

I used a standard size loaf pan for baking the bread. This recipe is quite generous and makes two loaves. 

Recipe
180 grams bread flour
90 grams rye flour
1 teaspoon baking soda
3/4 teaspoon baking powder
3/4 teaspoon salt
1/3 cup Golden syrup and molasses (add some of both to fill 1/3 cup)
270 grams milk

1. Whisk together the flours, baking soda, baking powder and salt together in a bowl. Mix together the milk and the syrup/molasses in another bowl then add to the flour mixture in portions. Mix thoroughly with a spatula. 
2. Preheat the oven to 95 degrees Celsius.
3. Bake for 1 hour at 95 C. then raise the temperature to 150 C. and bake for another 30 - 40 minutes. The bread should have a nice rise when it is fully baked.
4. Let the bread cool for a few minutes before removing from the pan. Cool completely before slicing. 

This bread tastes great with cream cheese and smoked salmon. 

Thank you to https://true-north-kitchen.com/wprm_print/8541# for this recipe. 


Read more »
Kathy
0 Comments
Japanese Wagashi

Japanese Wagashi


Elegant and delicious is the essence of Japanese wagashi. Traditional confections in Japan are called wagashi (和菓子). Most people associate these sweets with green tea and the tea ceremony. Usually, they are made with rice flour and anko (red bean paste). Wagashi is typically made from plant-based ingredients and uses the seasons to highlight these special desserts. Most often these desserts are made by either steaming or boiling the ingredients which pre-date Western influence in Japan. Wagashi are a great alternative dessert for people looking for vegan or gluten-free choices.

This simple but beautiful wagashi of a folded autumn leaf enclosing a bundle of red bean paste evokes an image of a fallen leaf. It is made from nerikiri which is one of the most commonly used wagashi ingredients. Neriki is a mixture of white bean paste and a binding agent called gyuhi. The dough is kneaded into a smooth texture and colored and can be easily molded into many different shapes.

This beautiful dessert was made by Okashidokoro Sasama located in downtown Tokyo. Another delicious dessert from the same shop evokes the image of autumn and a fallen chestnut and secondly a beautiful rendition of a green glaze and rustic pattern from a traditional ceramic teacup. 


The Tokyo Food Summit, held in November 2023 at Tokyo Big Sight, showcased the skills of the artisans from several famous wagashi shops.


Toraya is another wagashi shop with a long history. The shop was founded in Kyoto during the late Muromachi period and has been in business since. It has served the Imperial Palace since the time of Emperor Goyozei (1586-1611). In 1869, the capital of Japan transferred to Tokyo from Kyoto and the shop followed the move, but the Kyoto shop remained and it continues to operate there today. As you travel around Japan, you will see the Toraya shops in many locations. This shop is still as vibrant and bustling as it ever was.


Traditions are well respected in Japan but so is the need to remain relevant and connect with a new generation of customers. Matcha, green tea, has grown in popularity as a beverage worldwide as it is now served iced or hot, whipped and sweet. In Japan, the matcha boom has also rekindled opportunities for serving wagashi and these new sweets may now be shaped as your favorite Pokémon character instead of an elegant cherry blossom.

Have you tried red bean paste? What is your favorite wagashi? Hope you can find some of these delicious treats in your local city. Or if you are courageous enough, jump online and learn how to make them yourself.


Read more »
Kathy
0 Comments
Summer Cherry Pie

Summer Cherry Pie


Summer Delight

Depending where you live sour cherries may not be readily available, however, canned cherries are not a bad second choice. With a buttery sweet crust and tangy filling, this pie is a perfect dessert for summer.

Fits 20 cm pie pan

Dough:
100 grams cold butter cut into cubes

1/2 egg

1/4 teaspoon vinegar (such as apple vinegar)

20 ml water

175 grams  all purpose flour

1/4 teaspoon salt

1/2 teaspoon sugar


1 egg for egg wash

Rough sanding sugar


1.    In a food processor, mix together the flour, salt, sugar and butter for about 30 seconds.

2.    Mix together the egg, water & vinegar then add to the food processor and mix until the dough comes together.

3.   Remove the dough from the mixer and wrap in plastic wrap & keep in the refrigerator for at least 1 hour before using.


Note: increase recipe by ½ to have enough to make the cross hatch on top.


Filling:

2 ½ cans canned cherries (14.5 oz size)

70 grams sugar

30 grams tapioca starch

1 teaspoon vanilla or almond essence


1.    Roll out the dough to fit the pie pan and fit neatly into the pan. Put in the refrigerator until needed. With the leftover dough, cut slices to make the cross hatch and keep in the refrigerator also.

2.  Soak the cherries and sugar in a bowl for about 10 minutes then add the tapioca starch in portions and mix thoroughly with a spoon. Lastly, add the vanilla or almond essence.

3.    Pour mixture into large saucepan and heat on medium heat until just beginning to boil and thicken. Stir constantly so the starch doesn’t get lumpy. Turn off the heat and pour into a bowl to cool for about 15 minutes. Stir occasionally so the mixture doesn’t become lumpy.

4.   Pour the cherry mixture into the pie pan and arrange the cross hatch on the pie and brush with the egg wash. Sprinkle the dough portions of the pie with sanding sugar.

5.   Preheat oven to 180 C. and bake the pie for 40 – 50 minutes depending on your oven. Cover the top with foil if it browns too quickly.

6.  Cool completely before cutting the pie.


Read more »
Kathy
0 Comments
Rosemary Potato Bread

Rosemary Potato Bread


This is a robust but soft bread. The addition of the mashed potatoes adds more moisture to the loaf. This bread is delicious toasted with jam for breakfast or served with Sunday dinner.

Recipe:

375 grams bread flour

3/4 teaspoon salt

2 teaspoon pepper

5 grams sugar

1 1/2 teaspoon instant dry yeast

100 grams mashed potatoes (cooked mashed potatoes)

30 grams butter (room temperature)

2 tablespoons chopped fresh rosemary

200 grams water

1 egg mixed for egg wash

  1. Using a stand mixer, mix the flour, salt, pepper, yeast, sugar, rosemary & water in the stand mixer until the mixture is well incorporated. Add the mashed potatoes and continue to mix. Lastly, add the butter and mix until it is becomes smooth.
  2. Put on a flat surface and finish kneading until the dough is soft and supple. 
  3. Oil the bottom & sides of a bowl and put the dough inside. Cover with wrap. Let sit in a warm place for about 1 hour or until bread doubles in size.
  4. Remove dough from bowl. Cut dough into 2 equal pieces and roll into 2 balls. Place each piece side-by-side in a buttered bread pan. Cover with plastic wrap and let sit for about 1 hour in a warm place. Decorate with several pieces of rosemary and lightly brush with egg wash before baking.
  5. Preheat the oven and bake at 200 C. for about 45- 50 minutes. After baking, let cool for about 10 minutes before removing from the pan. Cool completely before slicing.
Read more »
Kathy
0 Comments
Angel Food Cake

Angel Food Cake


Who doesn't love this soft and delicious angel food cake? It looks bumpy and lumpy but it is tasty!

This cake is a bit unique with the addition of milk and salad oil to the recipe. These two ingredients add additional moisture that makes this a perfect dessert.


Recipe

Egg whites (room temperature) 450 grams

Granular Sugar 150 grams

Flour 150 grams 

Salt 1/2 teaspoon

Milk 6 tablespoons

Salad oil 6 tablespoons 

  1. Sift together the salt and flour into a bowl. In a separate bowl, mix together the milk and salad oil.
  2. Whip the eggs whites with a hand mixer for 3 - 4 minutes then add the sugar in 3 – 4 portions and mix until soft peaks form. Do not over mix.
  3. Use spatula and mix in the flour in portions. Lastly, add the milk/oil mixture and mix thoroughly.
  4. Spoon the batter into a large size chiffon cake pan (do NOT butter the inside of the pan). Preheat the oven to 170 C. and place the baking pan into the oven. Bake for 20 – 25 minutes depending on your oven.


Read more »
Kathy
0 Comments
Upside Down Banana Coconut Cake

Upside Down Banana Coconut Cake


The combination of banana and coconut just screams of summer, however, this combo is probably best in a cake rather than a drink. I was never a big fan of pineapple upside down cake, but replacing the pineapple with bananas just seemed right. I made a few adjustments to the traditional recipe and made this cake lighter and the crumble a little less sweet.

Sliced and ready for dessert
One tip is to use bananas that are not too ripe. Keep the old ripened bananas for the bread not this cake. Bananas are delicate and since you need to lightly cook them in the crumble before baking the cake they can easily become softened if they are old and too ripe.

Recipe

Cake
4 egg whites
110 grams sugar
4 egg yolks
20 grams almond flour
20 grams powdered sugar
90 grams flour
15 grams butter (melted)

1. Sift the almond powder, powdered sugar and flour together in a bowl.
2. Whip the eggs whites with a hand mixer and gradually  add the sugar in about 4 portions. Whip until the egg whites are stiff then add the egg yolks and mix with a spatula.
3. Add the almond flour mixture and mix lightly with a spatula. Lastly, mix in the butter in portions. Set aside and prepare the bananas.

Crumble
10 grams butter
50 grams sugar
20 grams water
30 grams chopped walnuts
2 bananas 

1. In a frying pan, heat the sugar so that it melts to caramel stage. Turn down the heat and add the butter. Be careful since the sugar is very hot. Lastly, add the water and stir mix thoroughly. 
2. Slice the bananas lengthwise and add to the frying pan. Lightly, cook for about 5 - 7 minutes turning so that each side is coated with the caramel. 
3. To bake, lightly butter and flour a square pan (20 cm square) and place a sheet of parchment paper on the bottom. Put the bananas on the bottom of the pan, sprinkle the walnuts around the side of the pan and pour the sauce over everything.  Spoon the cake batter over the bananas and be careful not to disturb the bananas on the bottom. 
4. Bake in a 180 degree (Celsius) preheated oven for about 35 - 40  minutes depending on your oven. After baking, let cool for about 10 minutes then carefully turn upside on a serving plate. Let cool before serving. 

Read more »
Kathy
4 Comments
Chocolate Brownie Bite Cookies

Chocolate Brownie Bite Cookies


Quick to make, easy to eat
I am running out of cookie ideas so will have to dig deeper for inspiration or revert back to baking cakes. We are getting used to having a container of cookies readily available for munching in the house which is cancelling out the steps I track each day. Oh well, these aren't usual times.

This is another quick recipe to put together. It should take about 20 minutes preparation and then about 30 minutes in the refrigerator before baking. Double the recipe if you want a larger batch but with only two people eating the results this size is best for my home. Recipe should make about 25 small cookies.

Recipe:

85 grams all purpose flour
10 grams cocoa powder
1/2 teaspoon baking powder
pinch of salt
55 grams butter (room temperature)
100 grams brown sugar
1 egg
1 teaspoon vanilla
145 grams chocolate (sweet chocolate or about 66% or less)

Please feel free to use a stand mixer if you have one for this recipe, but this recipe does not use one.

1. In medium size bowl, sift together the flour, cocoa powder, baking powder and salt.
2. In a small bowl, melt the chocolate over hot simmering water. When melted, remove from the heat and let cool.
3. In a large bowl, whisk the butter until soft and then add the brown sugar and whisk together. Then add the add the egg and mix well. Add the vanilla. Whisk in the chocolate in portions and mix well.
4. Add the dry ingredients to the chocolate mixture in portions and use a spatula to mix thoroughly. Cover with plastic wrap and put in the refrigerator for about 30 minutes so the dough will be easier to handle.
5. Preheat the oven to 180 degrees Celsius. Use a small spoon to spoon out the dough and lightly roll into round pieces about 20 grams each. I prefer small size cookies, but up to you on this point. Place the dough on a baking sheet lined with parchment paper or silpat. The cookies will spread when baked so leave room in between.
6. Bake for 12 - 15 minutes and let cool for a few minutes before removing from the pan. Enjoy!

Read more »
Kathy
4 Comments
Sourdough Banana Bread

Sourdough Banana Bread


During my stay at home days, I have been learning how to make sourdough starter and sourdough bread. Once the sourdough starter is ready though, it should be used and fed everyday. This is fine if you are plan to bake bread everyday, but I don't need that much bread in the house on a regular basis, so I looked for other ways to use the bread starter.

Lots of banana goodness in this loaf
Of course, a short search on the Internet produced many recipes that use sourdough starter in other baked goods than just bread. My favorite site for all things sourdough is The Perfect Loaf, this site is really a labor of love and painstakingly provides thorough and clear instructions for starting on the sourdough road. The  below recipe is from the Perfect Loaf but I have decreased the original recipe in half since I needed a smaller size bread. I also added a few walnuts and a banana on top.

Recipe
120 grams all purpose flour
1/4 teaspoon baking soda
1/4 teaspoon salt
50 grams chopped walnuts
65 grams butter (room temperature)
50 grams brown sugar
1 egg
65 grams sourdough starter
1 tablespoon honey
2 medium size bananas (mash with a fork)
1 tablespoon olive oil
1 teaspoon vanilla
1 banana for topping before baking

1. You can use a stand mixer or make by hand. This recipe description does not use a stand mixer. Prepare a loaf pan by lightly buttering and dusting with flour.
2. In a small bowl, measure together the flour, baking soda and salt.
3. In a large bowl, whisk the butter then add the brown sugar and mix. Next add the egg and mix together. Add the ingredients sequentially, but complete mixing before adding the next. Continuing mixing in the sourdough starter, honey, mashed bananas, olive oil, vanilla, flour and nuts.
4. Pour the mixture into the loaf pan. Slice a banana lengthwise and place on top before baking.
5. Bake in a preheated 180 degrees Celsius oven, for 35 - 40 minutes. Let cool for about 20 minutes before removing from the baking tin.

Sliced and ready for breakfast
Read more »
Kathy
4 Comments
Afternoon break Molasses Cookies

Afternoon break Molasses Cookies


Pour yourself a cup of coffee & enjoy an afternoon break with cookies
More cookie recipes. Yes, we need more cookies for this stressful time. I am baking small batches of cookies to enjoy a variety rather than having lots of the same type. Need to start planning ahead for the next flavor now that I have my craving for molasses satisfied.

This recipe can be easily put together in about 20 minutes once the butter is softened. If you have some helpers around the house then even faster.  Enjoy and see you for the next cookie recipe.

Recipe (makes about 20 cookies)
85 grams butter (room temperature)
80 grams brown sugar 
1  egg 
45 grams molasses 
220 grams flour 
1 teaspoon baking soda 
1/2 teaspoon ground cinnamon 
1/2 teaspoon ground ginger 
1/4 teaspoon ground cloves 
Pinch of salt
50 grams granular or turbinado sugar, for rolling cookies

1. In a large bowl, sift together the flour, baking soda, spices and salt.
2. In another large bowl, mix together the butter and brown sugar using a small whisk. You can also use a stand mixer for this recipe.
3. Mix in the egg and mix with the whisk then add the molasses and mix until well combined.
4. Add the dry ingredients to the butter mixture in several portions and mix well using a spatula. 
5. Put the bowl of dough into the refrigerator for at least one hour to chill
6. Form the dough into approximately 20 gram pieces each and roll in the sugar before placing on a baking tray. Leave some room between each piece since they will spread a little.
7. Bake at 180 degrees Celsius for about 12 - 15  minutes but don't let them become too dark. 


Read more »
Kathy
2 Comments
Covid Collaboration Polish Chałka

Covid Collaboration Polish Chałka


Hope everyone has friends or acquaintances to help provide baking inspiration during quarantine. Luckily, Facebook can enable and help us create new contacts. Nothing like a group bake to add a little excitement to the quarantine routine.


Among my FB friends, the baking challenge chosen was a Polish Chalka. This is a braided egg bread with raisins, if you choose, and is similar to a Jewish challah. The recipe was an inspiration from the Spruce Eats so please check the site for her full recipe, tips and tricks. I missed to bake bread at Easter and this satisfied my craving.

The original recipe produced a large loaf of bread, and with only two people in my home, I decided to reduce the portions. Also, if you don't have a stand mixer handling a large amount of dough by hand is challenging.

The below version is for a smaller bread but should be plenty for 4 - 5 people. I made a few tweaks, especially reducing the sugar.

Recipe
85 grams butter (room temperature)
100 grams sugar
1/4 teaspoon salt
170 grams milk
6 grams instant dry yeast
1 egg (room temperature)
415 grams all purpose flour
80 grams raisins (optional)

1. In a large bowl, sift together the flour and yeast.
2. In a saucepan, heat the milk to just boiling then pour into a bowl and cool lightly. Add the butter, sugar, egg and salt and mix thoroughly.
3. Add the milk mixture in 4 - 5 portions to the flour so that it is easier to mix especially if you are it doing by hand. Use a spatula or bench scraper to mix the dough. If you have a stand mixer then you can use it with a dough hook to mix everything.
4. Once thoroughly mixed, put on a flat board and knead the dough until smooth. The dough should be soft and supple. If it feels tough, spray lightly with water and knead until it begins to feel soft. Roll into a ball and let sit under a bowl for about 10 minutes.
5. After the dough rests under the bowl, add the raisins and mix in thoroughly. Roll into a ball and put in a lightly greased bowl and cover with plastic wrap and let rise for 1 hour in a warm space.
6. After the rise, divide into 3 equal pieces and shape into 3 logs about 35 cm long.  Braid the logs together and place on a baking sheet. Lightly brush with egg wash.
7. Let rise in a warm place for about 40 minutes. Bake at 190 degrees Celsius for about 30 minutes. If the bread starts to brown too quickly then cover with foil until baking is finished.
8. Cool thoroughly before cutting.

My braid was quite tight so was careful to bake thoroughly

Bread with jam is a great breakfast
Read more »
Kathy
1 Comments
Comforting Baked Custard Pie

Comforting Baked Custard Pie


We are still at home and observing social distancing. Japan has not implemented the drastic lockdown rules as other countries have so we are waiting to see how that develops and in the meantime I am still baking. To compensate for all of the desserts, I bought a steps tracker to check steps and distance during the morning neighborhood walks.

New plates look good with the custard pie

While browsing recipes, the custard pie jumped out at me. I have never made one of these and definitely haven't eaten one for a long time as well. So, why not.

Preparation is only about 15 minutes (add another 20 minutes if you make your own crust). Feel free to use a ready made crust if you really want to keep things simple. I think the custard recipe can be very forgiving if you need to either increase or decrease to fit your pie pan. I saw some recipes that included fresh cream in addition to the milk so depending on what is in your refrigerator feel free to experiment.

Pie Crust Recipe (fits 18 cm pie pan)

100 grams cold butter
1/2 egg
1/4 teaspoon vinegar (such as apple vinegar)
175 grams flour
1/2 teaspoon salt
1/2 teaspoon sugar

Egg white from one egg (use the yolk in the custard below)

1. Sift the flour, sugar and salt together in a bowl.
2. In a measuring cup, mix the egg, vinegar and enough water to make 65 ml liquid.
3. Cut the butter into small cubes and mix into the flour mixture using a pastry cutter. (You can also use a food processor for making the pie crust). Lastly, mix in the egg mixture.
4. Lightly knead together on a flat board to blend all the ingredients well. Flatten into a large circle and cover in plastic wrap. Put in the refrigerator for about 20 - 30 minutes before using.
5. Roll out the dough on a flat board to and fit in the pie pan. Cut off the excess dough with a knife. Brush the egg white around the inside of the pie dough.
6. Preheat the oven to 180 degrees Celsius and bake for about 10 minutes.

I bought Karin Pfeiff-Boschek's book on pies and saw for the first time a crust recipe that used vinegar in the recipe. I tried it and I really like the texture of the dough since it is very easy to roll out. Here is the link to her site you want more information  https://elegant-pie.com/.

Custard Pie

3 eggs plus the egg yolk from above
2 cups milk
2 teaspoons sugar
1/4 teaspoon salt
2 teaspoons vanilla extract
Nutmeg powder as needed

1. In a large bowl mix the eggs, egg yolk, sugar, salt & vanilla extract with a small whisk until well mixed. Strain this through a sieve which will remove any egg parts which were not mixed.
2. Pour into the warm baked pie shell and sprinkle with nutmeg powder and continue to bake at 180 degrees Celsius for about 30 minutes depending on your oven.

I had extra batter and baked in small milk bottles

Full pie baked and ready to serve


Read more »
Kathy
2 Comments
Stay at Home Peanut Butter Cookies

Stay at Home Peanut Butter Cookies


Coffee & Cookies. Life is good.
Starting week four of working from home so having a few snacks around the house is a good thing -- or may be not. After watching the daily news though, gaining a few kilos is the least of the problems for most people right now.

It is the beginning of April and Easter is in another week. I think we will be hunting eggs in our homes or yards with immediate family instead of going to church or having get togethers in restaurants. The only good news is the warmer weather and all of the blossoms are blooming. My neighborhood is an array of colors as the various cherry blossom trees, tulips and other flowers bloom.

This recipe is quite easy, should be about 20 minutes at the most to put together.

Recipe
(makes approximately 20 small cookies)

150 grams all purpose flour
1/2 teaspoon baking powder
1/2 teaspoon baking soda
1/4 teaspoon salt
100 grams creamy peanut butter
75 grams butter (room temperature)
30 grams granular sugar
30 grams brown sugar
1 egg
1 teaspoon vanilla

1. In a bowl, whisk together the flour, baking powder, baking soda & salt.
2. In another large bowl, soften the butter with a small whisk then add the sugars and mix thoroughly. Next add the egg in portions and continue mix. Add the peanut butter in several portions & mix. Lastly, add the vanilla.
3. Use a spatula and mix in the flour in several portions. While you clean up, let the dough rest in the refrigerator for about 20 - 30 minutes.
4. Use a spoon and divide the dough into about 20 - 25 grams pieces. Roll each piece into a ball and flatten with a fork to make a nice hatch design.
5. Bake at 170 degrees Celsius for about 15 - 18 minutes. 


Read more »
Kathy
0 Comments
Lockdown Banana Bread

Lockdown Banana Bread


I live outside Tokyo and technically we are not in a lock down, yet, but I have been in a work-from-home situation since mid-March. Japan has been aware of the virus since February due to close proximity to China so this is an ongoing story. During this stay at home time,  I've tried to show some constraint and only baked what could be reasonably consumed over a couple of days.

Instead of making fancy and fussy cakes, I just feel like a simple, quick and easy snack. With an easy recipe, I've been able to prepare dinner and make dessert at the same time. First was chocolate chip cookies, then oatmeal cookies and lastly this delicious banana bread.

Get the coffee ready
This simple recipe was borrowed from Sallysbakingaddiction and I added a few chocolate chips and an extra banana on top for decoration. I reduced the brown sugar a bit since the ripe bananas provide enough sweetness and the vanilla really draws out the banana flavor.

Recipe
(Fits 2 baking pans)

250 grams all purpose flour
1 teaspoon baking soda
1/4 teaspoon salt
1/4 teaspoon cinnamon powder
115 grams butter (room temperature)
120 grams brown sugar
2 eggs (room temperature)
80 grams plain yogurt
3 ripe bananas
1 teaspoon vanilla extract
40 grams chopped walnuts
25 grams chocolate chips

1. In a bowl, sift together the flour, baking soda, salt & cinnamon powder.
2. In a small bowl, use a fork to mash 2 bananas.
3. In another larger bowl, use a small whisk to mix the softened butter until smooth. Next add the brown sugar and mix thoroughly. Add each egg separately and mix gently until each egg is incorporated thoroughly. Lastly, add the yogurt, mashed bananas and vanilla extract.
4. Add the flour mixture in portions to the butter mixture. Use can use a spatula or small whisk to mix. Lastly, add the nuts and chocolate chips.
5. Lightly butter and flour the baking tins and then divide the batter evenly between the two tins. Peel and slice one banana lengthwise and put a slice on top of each tin in the middle of the batter.
6. Preheat the oven and bake at 180 degrees Celsius for 35 - 40 minutes depending on your oven.
 7. After baking, cool for about 10 minutes before removing from the pan to cool completely.
Read more »
Kathy
0 Comments
Creamy Chocolate Raspberry Mousse Cake

Creamy Chocolate Raspberry Mousse Cake


Creamy chocolate mousse with raspberry gelatin
Winter is my season of choice for baking with chocolate. My house is not well insulated so it is chilly even with the heat on so basically a good place to work with chocolate.

In this recipe you need to combine the warm chocolate with the warm anglais - keeping both at about the same temperature - and the room temperature can effect how these two mix together.

This recipe does have several steps to it but you can make it a day ahead if you want to have it for a special dinner.

I used an 18 cm x 6 cm baking ring to make this cake.

Cake
60 grams butter
40 grams sugar
1 egg yolk
2 egg whites (whites form 2 eggs)
40 grams sugar (to mix with egg whites)
60 grams flour
15 grams cocoa powder
1 tablespoon milk


1. Sift the flour and cocoa powder together.
2.  Put the butter in a bowl and mix with a small whisk until soft and then add the sugar& mix then add the egg yolk.
3. In another bowl, mix the egg white with the sugar until soft peaks form. Mix into the butter mixture in portions and mix with a spatula. Add the flour mixture and. Lastly, add the milk and mix thoroughly.
4. Fill the baking ring and bake at 180 degrees Celsius  for 15 – 20.

Cream Raspberry (I used a 16 cm and 12 cm rings)
140 grams raspberry puree
1 egg yolk
1 egg
40 grams sugar
10 grams butter
3 grams gelatin

1.  Heat the puree in a sauce pan until lightly boiling.
2.   In a bowl, mix the egg yolk, egg & sugar and mix. Add in the puree and mix then add back to the saucepan. Heat on low heat until just lightly thickened.
3.  Take off the heat and add the gelatin and mix. Lastly, add the butter and mix.
4.   Cool over ice water. Then pour into the rings which has plastic wrap sealed at the bottom. Place in the refrigerator until it is firm.

Chocolate Mousse
135 grams milk
2 egg yolks
25 grams sugar
6 grams gelatin
200 grams fresh cream 
180 grams dark chocolate

1.  Melt the chocolate over hot water and keep at about 40 degrees Celsius.
2. Whip the cream until a little stiff.
3. Mix the sugar and the egg yolks. Heat the cream until just boiling then add to the bowl with the egg mixture and then add back to the pan and heat on a low heat until lightly thickened. Add the gelatin. Strain into another bowl and lightly cool. The chocolate and egg mixture should be about the same temperature.
4. Mix the egg mixture into the chocolate in portions and use a small whisk to combine.
5. Scoop some of the whipped cream into the chocolate mixture and use a spatula to mix together. Add the remaining cream in portions and mix.

Putting the cake together
1. Place the large 18 cm ring on a cake plate and place a mousse film inside. Place the cake inside and cover with about 2 tablespoons raspberry or strawberry jam. Next add a small amount of mousse and spread evenly. Next put the 16cm cream raspberry gel on the mousse and fill with the mousse. Lastly, add the 12 cm cream raspberry gel on the top. 
2. Use any remaining mousse to put into a pastry bag for decoration.


Ready for dessert


Read more »
Kathy
0 Comments